Test drive
First of all: congrats on getting this far! Let's spin our RC for a ride.
Before continuing:
- Make sure your RC is powered up (not the Jetson Nano, the actual RC).
- Make sure that the camera is connected and powered up (if you're using a USB camera).
- Make sure that your RC has enough space around it, depending on what throttle values you've defined.
Test drive using a gamepad
Change to the directory you've created with the donkey createcar command:
cd ~/mycar
Start the manage.py script with the drive command and the --js flag, to control your RC with your gamepad:
python manage.py drive --js
The output should look like:
using donkey v3.1.1 ...
loading config file: /home/your_username/mycar/config.py
loading personal config over-rides

config loaded
cfg.CAMERA_TYPE CVCAM
cfg.CAMERA_TYPE CVCAM
Adding part CvCam.
Adding part XboxOneJoystickController.
Adding part ThrottleFilter.
Adding part PilotCondition.
Adding part RecordTracker.
Adding part ImgPreProcess.
Adding part DriveMode.
Adding part AiLaunch.
Adding part AiRunCondition.
Init ESC
Adding part PWMSteering.
Adding part PWMThrottle.
Tub does NOT exist. Creating new tub...
New tub created at: /home/your_username/mycar/data/tub_15_20-01-02
Adding part TubWriter.
You can now move your joystick to drive your car.
It'll also show you your controller mapping and the controller name:
Joystick Controls:
+------------------+---------------------------+
|     control      |           action          |
+------------------+---------------------------+
|     a_button     |        toggle_mode        |
|     b_button     |  toggle_manual_recording  |
|     x_button     |    erase_last_N_records   |
|     y_button     |       emergency_stop      |
|  right_shoulder  |   increase_max_throttle   |
|  left_shoulder   |   decrease_max_throttle   |
|     options      |  toggle_constant_throttle |
|      circle      | show_record_acount_status |
|        R2        |      enable_ai_launch     |
| left_stick_horz  |        set_steering       |
| right_stick_vert |        set_throttle       |
|  right_trigger   |       set_magnitude       |
|   left_trigger   |       set_magnitude       |
+------------------+---------------------------+
Opening /dev/input/js0...
Starting vehicle...
Device name: Xbox Wireless Controller
Starting vehicle...
recorded 10 records
recorded 20 records
recorded 30 records
recorded 40 records
recorded 50 records
recorded 60 records
recorded 70 records
recorded 80 records
recorded 90 records
recorded 100 records
...
A tub is a folder containing data from a drive. It's located in the data directory inside the mycar directory. The data is made up of camera images (JPEGs), along with steering and throttle values (JSONs).
We'll use this data later on to train our models.
If you make a mistake while driving, you can delete the last 100 records by using the button you've mapped to the erase_last_N_records control.
Test drive using the Web interface
The Web interface can sometimes be a bit simpler to use, since it allows you to see the camera output and has a nice GUI for all of the autopilot settings. Let's try it out.
First, change to the directory you've created with the donkey createcar command:
cd ~/mycar
Start the manage.py script with the drive command:
python manage.py drive
If all went well, the end of the output should say:
You can now go to <your pis hostname.local>:8887 to drive your car.
Starting vehicle...
8887
You can now open up your browser, and enter your Jetson Nano's IP with the port 8887 to control your car:
192.168.x.xxx:8887
Before starting up your RC, set the Max Throttle value to 50% or less. By default it will allow your RC to go as fast as it can, regardless of the values you've set in myconfig.py. A lot of RC's can easily go over 50MPH/80KPH, so this could cause a world of pain.
You should be seeing something like this:
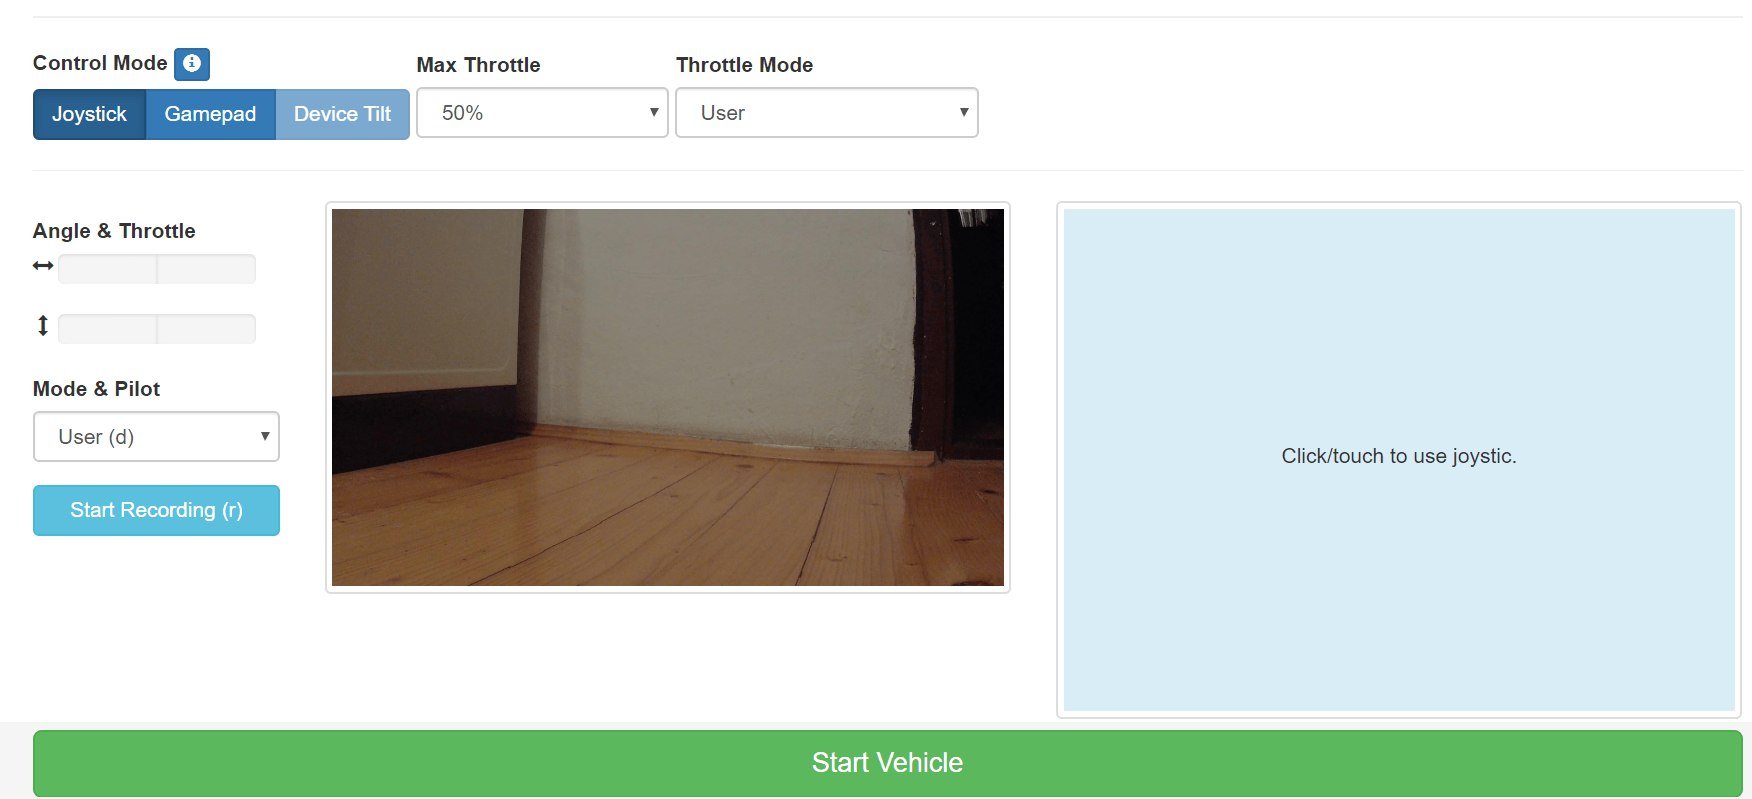
Let's break it down:
- The Control Mode has three options:
- Joystick: controls the RC via the blue touch/click area on the screen. You can also use I/K/J/L as forward/reverse/left/right controls.
- Gamepad: uses a gamepad connected to the device that's browsing the page. Haven't tried this one yet, it seems it only works on Linux with some controllers.
- Device Tilt: intended for smartphones browsing the site, you tilt the phone to control the car.
- Max Throttle: defines the maximum throttle the vehicle can achieve when the user presses full forward throttle via the controls.
- Throttle Mode has two options:
- User: where the user gives the throttle manually via the controls.
- Constant (Selected Max) which constantly keeps the throttle at the value defined in the Max Throttle dropdown.
- Angle & Throttle show the current values of throttle and steering. Useful when looking at how your autopilot drives.
- Mode & Pilot has three modes:
- User: where the user manually controls both the steering and throttle.
- Local Pilot: where the autopilot/model controls both the steering and throttle.
- Local Angle: where the autopilot controls the steering, but the user controls the throttle.
- Start Recording: toggles data recording.
- Start Vehicle starts the vehicle if it's in autopilot mode.
A quick note if you're using an USB camera and it's showing a blue-ish picture. The default color space for the CVCAM is BGR, since it's an OpenCV camera. Don't worry about it, it makes no practical difference for your model.
If, however, you insist on seeing the CVCAM output in RGB, open up the cv.py script, found in your projects folder, inside the donkeycar/donkeycar/parts directory:
nano ~/projects/donkeycar/donkeycar/parts/cv.py
Find the CvCam class, and:
- Add an instance of the
ImgBGR2RGBclass to a class variable - Call the
run()method of theImgBGR2RGBinstance any time the class returns an image frame
The resulting CvCam class code should look like this:
class CvCam(object):
    def __init__(self, image_w=1280, image_h=720, image_d=3, iCam=0):

        # Added an instance of the converter class
        self.imgConverter = ImgBGR2RGB()
        self.frame = None
        self.cap = cv2.VideoCapture(iCam)
        self.running = True
        self.cap.set(3, image_w)
        self.cap.set(4, image_h)

    def poll(self):
        if self.cap.isOpened():
            ret, self.frame = self.cap.read()

    def update(self):
        while(self.running):
            self.poll() # poll the camera for a frame

    def run_threaded(self):
        return self.imgConverter.run(self.frame) # Convert the image to RGB

    def run(self):
        self.poll()
        return self.imgConverter.run(self.frame)  # Convert the image to RGB

    def shutdown(self):
        self.running = False
        time.sleep(0.2)
        self.cap.release()
Now you should be seeing your camera output in RGB. But as I said, it doesn't really matter to the model.