Simulator mod: High resolution images
If we want to use the simulator to gather training data that's larger than the default 160x120 image size, we'll need to create a modified version of it.
Setting up the simulator locally
First off, let's clone (or fork) the original simulator Tawn Kramer made for Donkey from GitHub.
git clone --single-branch --branch donkey https://github.com/tawnkramer/sdsandbox
If you're wondering why aren't I just using the git clone --branch command: it clones all branches, but checks out just the one you've passed to the flag. Since Unity projects can be quite large, and Tawn has several branches on the repo, we'd end up downloading a lot of stuff we don't need.
We'll also need to install Unity. First you need to download and install the Unity Hub:
After installing it, open it and select the Installs tab from the left sidebar, click the blue Add button on the right and install the latest official release.
After installing the latest release of Unity, select the Projects tab on the left sidebar, click the silver Add button and select the sdsim folder from inside the folder where you've cloned/downloaded the simulator.
You can now click on the project you've added and you're good to go.
Modifying the camera resolution
After opening the project in Unity, open up the Prefabs folder (in the project view, lower left by default) and then open the donkey prefab, which is the default RC model prefab for the simulator.
Inside the prefab hierarchy (upper left by default) you can see the cameraSensorBase which contains the CameraSensor, which is the RC camera sensor that we use to generate our training data (take pictures from inside the simulator).
After selecting the CameraSensor, we can see, in the inspector on the right side of the screen, that there is a CameraSensor script connected to it. You can open it by double clicking on it or finding it in the lower left project viewer inside Assets/Scripts/CameraSensor.cs.
We'll make the width and height fields of the class static, so we can edit them from another script we'll create:
\\ You can put whatever resolution you want to be default here.
public static int width = 640;
public static int height = 480;
And we'll change the parameters of the ReadPixels function to use our width and height:
tex.ReadPixels(new Rect(0, 0, width, height), 0, 0);
We'll also edit the CameraHelper script to use our static fields for the width and height:
Texture2D texture2D = new Texture2D(CameraSensor.width, CameraSensor.height, TextureFormat.RGB24, false);
texture2D.ReadPixels(new Rect(0, 0, CameraSensor.width, CameraSensor.height), 0, 0);
Now go to the Scenes folder and open the menu scene and add a Dropdown element to the menu by right clicking on the Canvas and selecting UI > Dropdown.
We'll be using this dropdown as our resolution picker, so go ahead and click on it, and inside the inspector panel add all of the resolutions you'd like to be able to use as options:
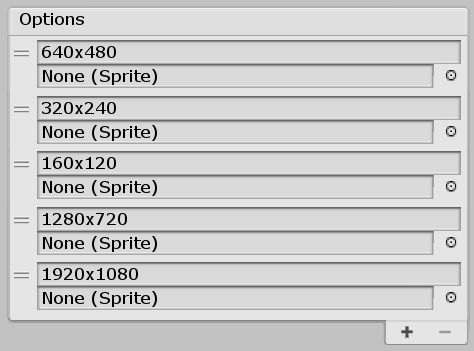
Then resize and position the dropdown on a place you'd like it to be on the menu:
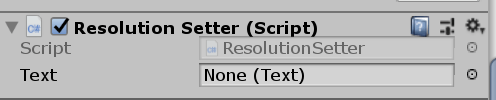
Now go back to the Scripts folder and add a new class called ResolutionSetter. This class will set the resolution inside the CameraSensor class based on the selected option in the dropdown.
Here's the code for the ResolutionSetter class:
using System.Collections;
using System.Collections.Generic;
using UnityEngine;
using UnityEngine.UI;

public class ResolutionSetter : MonoBehaviour
{
    //Attach this script to a Dropdown GameObject
    Dropdown m_Dropdown;
    //This is the string that stores the current selection m_Text of the Dropdown
    string m_Message;
    //This Text outputs the current selection to the screen
    public Text m_Text;
    //This is the index value of the Dropdown
    int m_DropdownValue;
    void Start()
    {
        //Fetch the Dropdown GameObject
        m_Dropdown = GetComponent<Dropdown>();
        //Add listener for when the value of the Dropdown changes, to take action
        m_Dropdown.onValueChanged.AddListener(delegate {
            DropdownValueChanged(m_Dropdown);
        });
        setCameraSensorRes(m_Dropdown.options[m_DropdownValue].text);
    }

    void DropdownValueChanged(Dropdown change)
    {
       setCameraSensorRes(m_Dropdown.options[change.value].text);
    }

    void setCameraSensorRes(string resolution){
        CameraSensor.width = System.Convert.ToInt32(resolution.Split('x')[0]);
        CameraSensor.height = System.Convert.ToInt32(resolution.Split('x')[1]);
    }
}
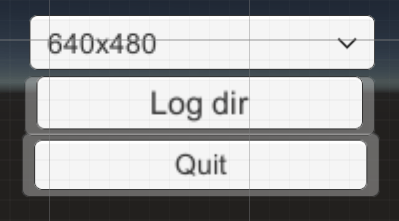
Now go back to the Scenes folder and open the menu scene once again. Select the dropdown element we created and in the inspector panel, drag and drop the ResolutionSetter script on it:
And that's it. Now the output images will have the resolution that you've set in the main menu using the dropdown.
Updating the default donkey-gym port
One thing we have to edit in donkey itself before we can use our modded simulator:
-
Go to your donkeycar project folder
-
Go to donkeycar/parts/ and open up dgym.py
-
Find the following line and change the port number from 9090 to 9091:
def __init__(self, sim_path, port=9091, headless=0, env_name="whatever-env-name-here", sync="asynchronous"):
Now when you want to control your sim through the simulator manage.py script:
- Start it as you usually would, it should start the simulator automatically
- Open the simulator and select the track you'd like the car to drive on
- Click the NN Control over Network button
- Open up localhost:8887 in a browser and you should be good to go!
If you're compiling your model to a different directory than the default one, or you've changed the project/executable name, be sure to update the myconfig.py file, specifically the DONKEY_SIM_PATH variable.
Building and using the modded simulator
You can now go to File > Build Settings (or press CTRL + SHIFT + B), select Build at the bottom of the screen and select the folder where your simulator binary is. After building, you can use your modded version the same way you used the default Donkey simulator release.
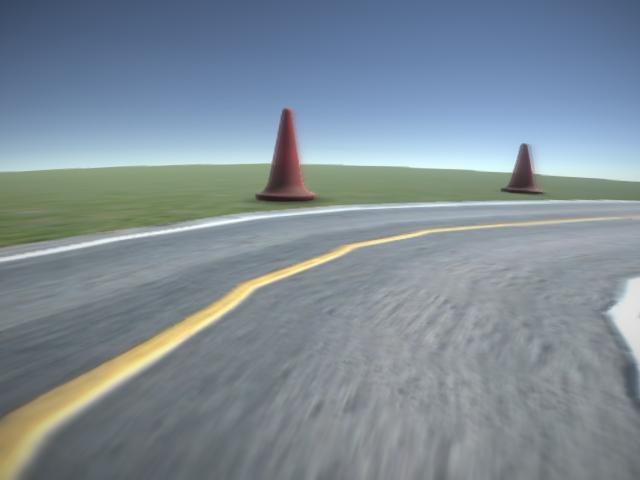
Here's what a sample output image when the dropdown is set to 640x480: