Advanced lane finding model
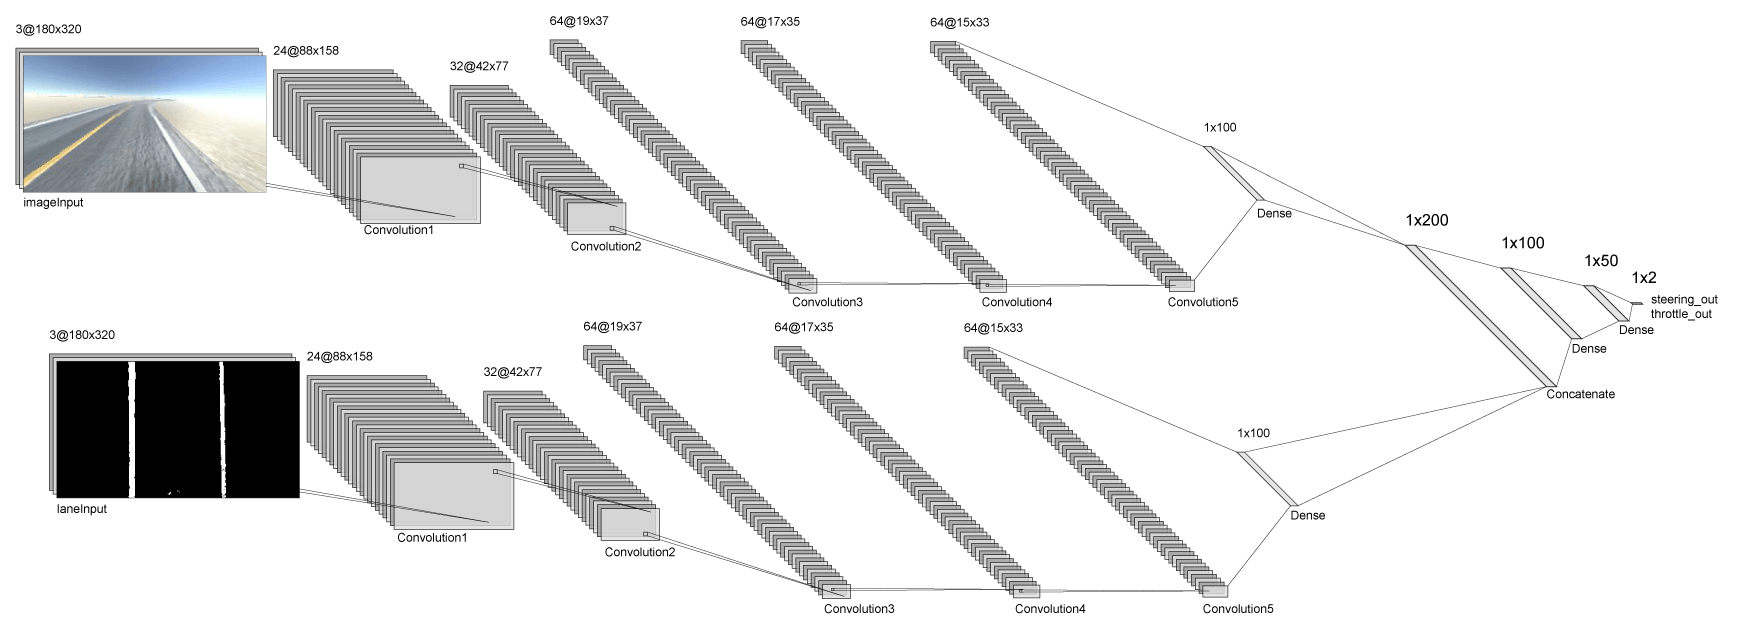
The model will consist of two parallel CNNs, each of which end with a dense 100-unit layer, which we will then concatenate and pass through three additional dense layers, and end with two linear activations. The model should have about 6.5 million parameters, which take up about 2GB of VRAM, so we should be able to run it on our Jetson Nano with half that much RAM to spare. :)
The idea of teaching a vehicle to drive autonomously
Now I know that a whole separate (and rather big) CNN is an overkill for the thresholded binary image, but the main reason why I'm currently doing it like this is to test if its possible to have multiple specialized parts of the architecture all siphon in to a smaller final part (the last n dense layers) in order for the car to make a decision where to steer and how much to throttle, which is more or less how you do everything while you're in a car, parking, driving, you just combine multiple inputs, e.g.:
- Checking your mirrors and dead angle to make sure you're safe to do a maneuver - collision avoidance, object recognition and tracking
- Recognizing a sign that says what exit you should take in order to get to your destination
- Actually knowing where you are with respect to that exit and by what path can you get to it - path planning, localization
- Actually give the appropriate steering and throttle to actually perform the maneuver
So no matter what we're doing in a car, be it parking, changing lanes or driving to a destination, all we can really do to control the car is turn the steering wheel and control its speed (assuming no gear shifting, e.g. an electric car 😋), we're just taking in the input from our surroundings, mostly using our eyes, which we analyze through a series of specialized procedures which ultimately lead us to control our car based on the decisions we've made, in order to perform a maneuver.
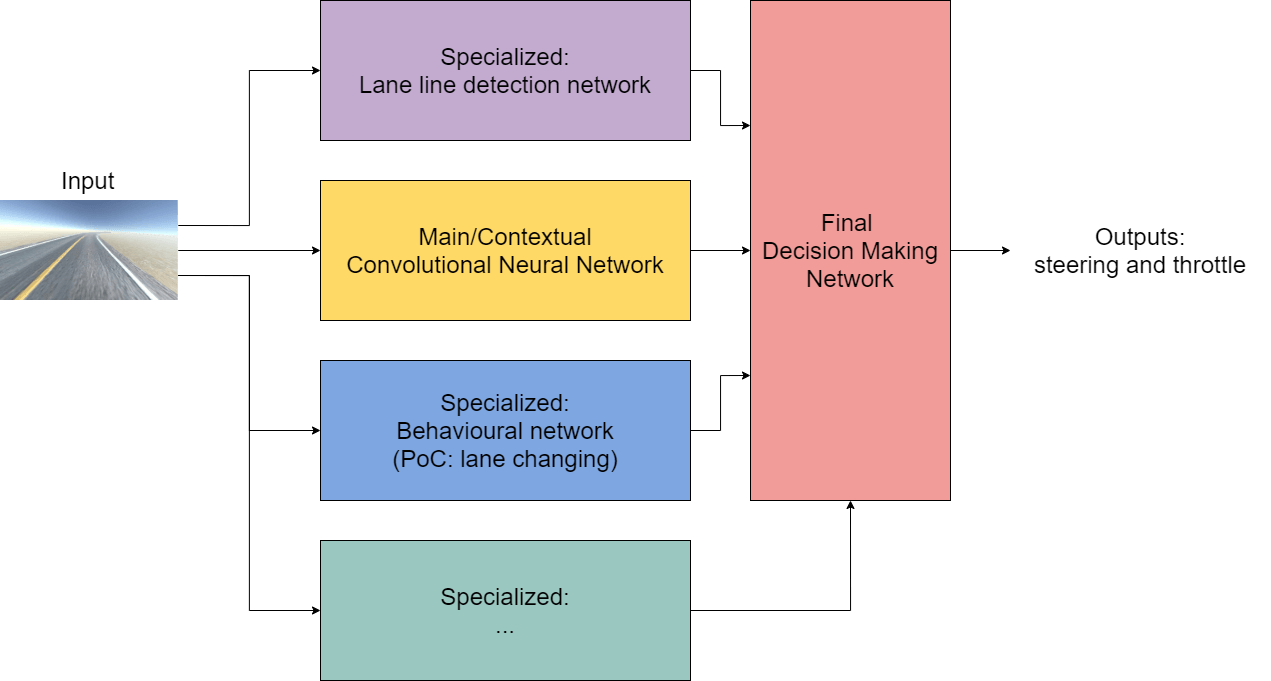
So what I wanted to do is to have a series of specialized parts in the net, which we could even call smaller subnets, which would take the input images and extract highly specific data from it, using (relatively) specialized procedures, which we would then plug into the final layer, along with the first convolutional network that uses the raw input image, which should give the final part of the network enough context about the world and enough information in order to appropriately control the RC.
It would look something like this:
I was playing around with the idea in my mind when I saw Andrej Karpathy's talk on PyTorch at Tesla, where he explained their use of HydraNets. In a nutshell, because they have a 1000 (!) distinct output tensors (predictions), and all of them have to know a ton of context and details about the scene, they use a shared backbone, like this (screenshot taken from YouTube: PyTorch at Tesla:
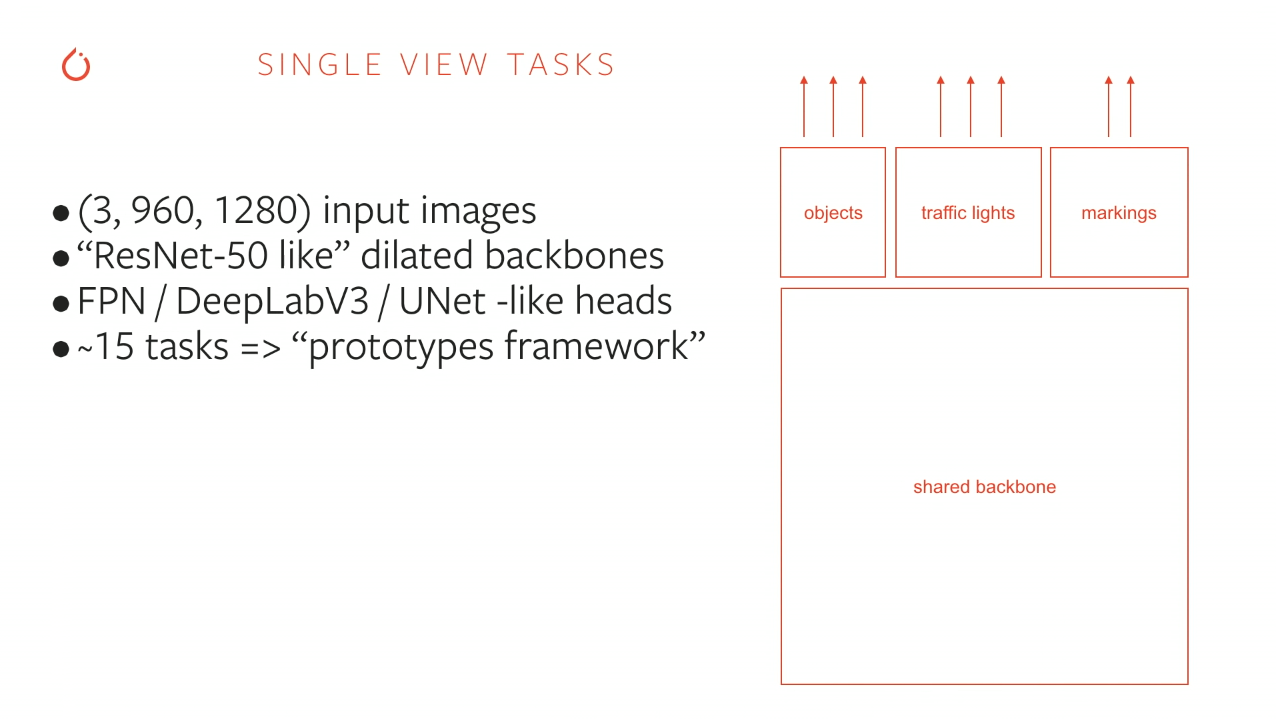
They actually have 48 networks that output a total of 1000 predictions, which is insane to do in real-time (on 1000x1000 images and 8 cameras) while being accurate enough to actually drive living humans on real roads. Though, they do have some pretty sweet custom hardware (FSD2), unlike our Jetson Nanos 😢.
Now, it obviously makes much more sense to do what Tesla did, to have a shared backbone since a lot of the information that the backbone extracts from the input images can be applied to all of the specialized tasks, so you don't have to learn them all over again for each and every one of them.
But I figured, what the heck, I'd try my idea out, which I did, since the main reason for doing this is to actually learn to apply ML/DL to something I could actually see drive around my backyard, and when we teach the car to do behaviours like lane changing in the next chapter, you'll see that it actually works!
This is what it looks like in action:
Creating a Keras model
First off, we'll create a Keras model in the donkeycar/parts folder. I'll be calling it OriModel.
from donkeycar.parts.keras import KerasPilot

from tensorflow.python.keras.models import Model, Sequential
from tensorflow.python.keras.layers import Input, Dense, Activation, Dropout, Flatten, Conv2D
from tensorflow.python.keras.layers.merge import Concatenate

import cv2
import numpy as np
We'll be inheriting the base KerasPilot class for Donkey, the model will be a sequential one and among others it will use dense, 2D convolutional layers and the concatenation layer.
We'll also need OpenCV and Numpy for our image preprocessing.
We'll start by inheriting the base class and implementing the constructor and compile methods:
class OriModel(KerasPilot):
    '''
    Custom model that takes an input image and feeds it and a preprocessed version of it to the model.
    The preprocessing converts the image to HSL color space, extracts the S channel and thresholds it.
    The thresholded S channel is passed to the model to help find lane lines easier.
    '''
    def __init__(self, model=None, input_shape=(180, 320, 3), *args, **kwargs):
        super(OriModel, self).__init__(*args, **kwargs)
        self.model = oriModel(inputShape=input_shape)
        self.compile()

    def compile(self):
        self.model.compile(optimizer=self.optimizer,
                loss='mse')
We'll want to preprocess images at runtime, so we can use it during inference, so we'll implement the run method accordingly:
def run(self, inputImage):
        # Preprocesses the input image for easier lane detection
        extractedLaneInput = self.processImage(inputImage)
        # Reshapes to (1, height, width, channels)
        extractedLaneInput = extractedLaneInput.reshape((1,) + extractedLaneInput.shape)
        inputImage = inputImage.reshape((1,) + inputImage.shape)
        # Predicts the output steering and throttle
        steering, throttle = self.model.predict([inputImage, extractedLaneInput])
        print("Throttle: %f, Steering: %f" % (throttle[0][0], steering[0][0]))
        return steering[0][0], throttle[0][0]
We'll use the code we wrote in the previous chapter and unify it in a couple helper methods:
def warpImage(self, image):
    # Define the region of the image we're interested in transforming
    regionOfInterest = np.float32(
    [[0,  180],  # Bottom left
    [112.5, 87.5], # Top left
    [200, 87.5], # Top right
    [307.5, 180]]) # Bottom right

    # Define the destination coordinates for the perspective transform
    newPerspective = np.float32(
    [[80,  180],  # Bottom left
    [80,    0.25],  # Top left
    [230,   0.25],  # Top right
    [230, 180]]) # Bottom right
    # Compute the matrix that transforms the perspective
    transformMatrix = cv2.getPerspectiveTransform(regionOfInterest, newPerspective)
    # Warp the perspective - image.shape[:2] takes the height, width, [::-1] inverses it to width, height
    warpedImage = cv2.warpPerspective(image, transformMatrix, image.shape[:2][::-1], flags=cv2.INTER_LINEAR)
    return warpedImage

def extractLaneLinesFromSChannel(self, warpedImage):
    # Convert to HSL
    hslImage = cv2.cvtColor(warpedImage, cv2.COLOR_BGR2HLS)
    # Split the image into three variables by the channels
    hChannel, lChannel, sChannel = cv2.split(hslImage)
    # Threshold the S channel image to select only the lines
    lowerThreshold = 65
    higherThreshold = 255
    # Threshold the image, keeping only the pixels/values that are between lower and higher threshold
    returnValue, binaryThresholdedImage = cv2.threshold(sChannel,lowerThreshold,higherThreshold,cv2.THRESH_BINARY)
    # Since this is a binary image, we'll convert it to a 3-channel image so OpenCV can use it
    thresholdedImage = cv2.cvtColor(binaryThresholdedImage, cv2.COLOR_GRAY2RGB)
    return thresholdedImage

def processImage(self, image):
    warpedImage = self.warpImage(image)
    # We'll normalize it just to make sure it's between 0-255 before thresholding
    warpedImage = cv2.normalize(warpedImage,None,0,255,cv2.NORM_MINMAX,cv2.CV_8U)
    thresholdedImage = self.extractLaneLinesFromSChannel(warpedImage)
    one_byte_scale = 1.0 / 255.0
    # To make sure it's between 0-1 for the model
    return np.array(thresholdedImage).astype(np.float32) * one_byte_scale
And now to the architecture/model itself. First, let's define the inputs and the dropout rate:
def oriModel(inputShape, numberOfBehaviourInputs):

    # Dropout rate
    keep_prob = 0.9
    rate = 1 - keep_prob

    # Input layers
    imageInput = Input(shape=inputShape, name='imageInput')
    laneInput = Input(shape=inputShape, name='laneInput')
    behaviourInput = Input(shape=(numberOfBehaviourInputs,), name="behaviourInput")
Now let's define the upper CNN, which takes in the raw image as its input:
# Input image convnet
    x = imageInput
    x = Conv2D(24, (5,5), strides=(2,2), name="Conv2D_imageInput_1")(x)
    x = LeakyReLU()(x)
    x = Dropout(rate)(x)
    x = Conv2D(32, (5,5), strides=(2,2), name="Conv2D_imageInput_2")(x)
    x = LeakyReLU()(x)
    x = Dropout(rate)(x)
    x = Conv2D(64, (5,5), strides=(2,2), name="Conv2D_imageInput_3")(x)
    x = LeakyReLU()(x)
    x = Dropout(rate)(x)
    x = Conv2D(64, (3,3), strides=(1,1), name="Conv2D_imageInput_4")(x)
    x = LeakyReLU()(x)
    x = Dropout(rate)(x)
    x = Conv2D(64, (3,3), strides=(1,1), name="Conv2D_imageInput_5")(x)
    x = LeakyReLU()(x)
    x = Dropout(rate)(x)
    x = Flatten(name="flattenedx")(x)
    x = Dense(100)(x)
    x = Dropout(rate)(x)
I'll explain why I'm using LeakyReLU in a moment. Let's define the bottom CNN which takes in the thresholded lane image as its input:
# Preprocessed lane image input convnet
    y = laneInput
    y = Conv2D(24, (5,5), strides=(2,2), name="Conv2D_laneInput_1")(y)
    y = LeakyReLU()(y)
    y = Dropout(rate)(y)
    y = Conv2D(32, (5,5), strides=(2,2), name="Conv2D_laneInput_2")(y)
    y = LeakyReLU()(y)
    y = Dropout(rate)(y)
    y = Conv2D(64, (5,5), strides=(2,2), name="Conv2D_laneInput_3")(y)
    y = LeakyReLU()(y)
    y = Dropout(rate)(y)
    y = Conv2D(64, (3,3), strides=(1,1), name="Conv2D_laneInput_4")(y)
    y = LeakyReLU()(y)
    y = Dropout(rate)(y)
    y = Conv2D(64, (3,3), strides=(1,1), name="Conv2D_laneInput_5")(y)
    y = LeakyReLU()(y)
    y = Flatten(name="flattenedy")(y)
    y = Dense(100)(y)
    y = Dropout(rate)(y)
Now we have to concatenate the two networks and feed them into the last three dense layers:
# Concatenated final convnet
    c = Concatenate(axis=1)([x, y])
    c = Dense(100, activation='relu')(c)
    c = Dense(50, activation='relu')(c)
And finally, we'll define the output and return the model:
# Output layers
    steering_out = Dense(1, activation='linear', name='steering_out')(o)
    throttle_out = Dense(1, activation='linear', name='throttle_out')(o)
    model = Model(inputs=[imageInput, laneInput, behaviourInput], outputs=[steering_out, throttle_out])

    return model
Why LeakyReLU
As every model, this one began as one thing and ended up a whole different thing in terms of hyperparameters and the architecture. I'll explain that in much more detail in the next chapter. But one thing that happened to me while training the above model using ReLU as the activation function for the convolutional layers was dying ReLU(s).
First, let's remember how the ReLU (Rectified Linear Unit) function is defined:
++
f(x) \begin{cases}
x & \text{when x=>0}\\
0 & \text{when x<0}
\end{cases}
++
This is what it looks like when plotted:
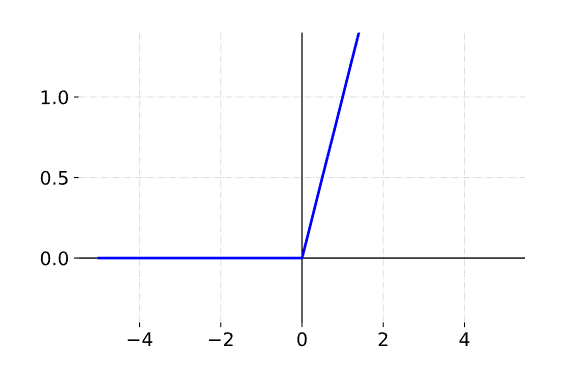
You can see that any negative input will result in a 0 activation for the ReLU function.
Now imagine we get a large negative value that gets input to our unit that uses the ReLU activation function. It will cause the unit weights to update in a way that will prevent it to ever be activated again.
This is a known disadvantage of ReLU, and there are even papers written on this topic alone 1. Stanford's course CS231n states that: you can find that as much as 40% of your network can be “dead” .
In my case, the neural network was just outputting the same throttle and steering values for every input. And since it had a lot of layers, I knew it should be learning at least something, and after removing the small (10%) dropout rate I've implemented, and after it still hasn't changed, I realised that many of the convolutional units weren't really outputting anything, which caused the rest of the network to just have the same output over and over again.
The fix was obviously to use either LeakyReLU or PReLU or any other activation function made specifically to overcome this advantage of ReLUs, while still preserving it's linear non-saturating form.
Why not PReLU? Because I wanted to try something simple before having an additional parameter to train, which I'd get by using PReLUs, and after trying out LeakyReLU the model trained just fine, with the loss being close to 0.001 (using MSE as the loss function).
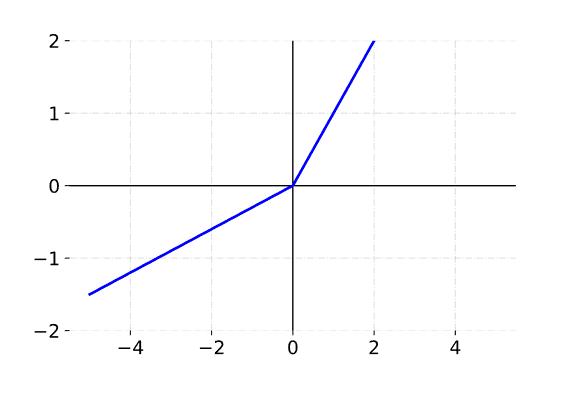
Here's the definition of LeakyReLU
++
f(x) \begin{cases}
x & \text{when x=>0}\\
\alpha \cdot x & \text{when x<0}
\end{cases}
++
The default alpha in Keras is 0.3. Here's a plot of LeakyReLU with $\alpha = 0.3$:
And here's a plot when $\alpha = 0.03$:
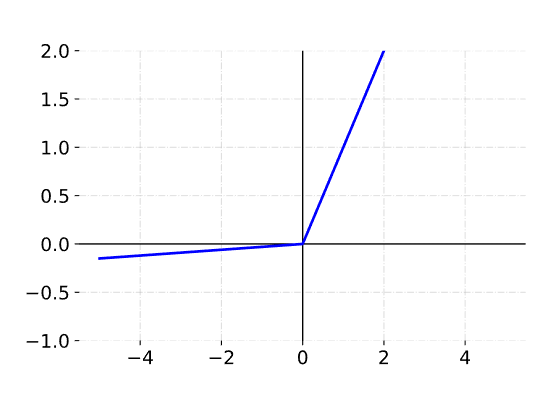
You can choose whichever $\alpha$ value you'd like. This will allow the unit to activate even if the value is negative.
Speaking of choosing $\alpha$, the main idea behind PReLU is to make it a parameter which the network will learn. You can read about PReLUs in this paper they were first proposed by He et al. or you can take a look at the Keras implementation here.
Training the network
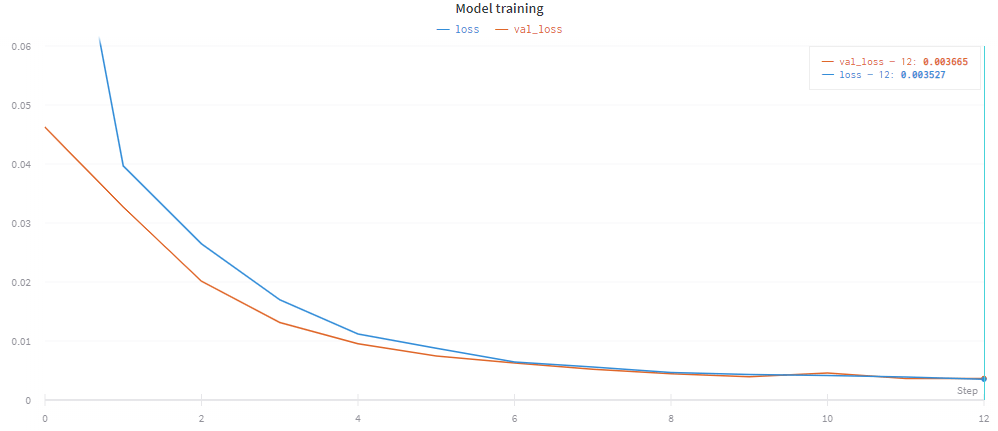
I've trained the network using about 10k records made on the randomly generated track, and left the network to train for 12 epochs which took 21m 45s on my RTX 2060. The final validation loss was 0.003665.
Here is a graph showing a plot of the training loss vs the validation loss:
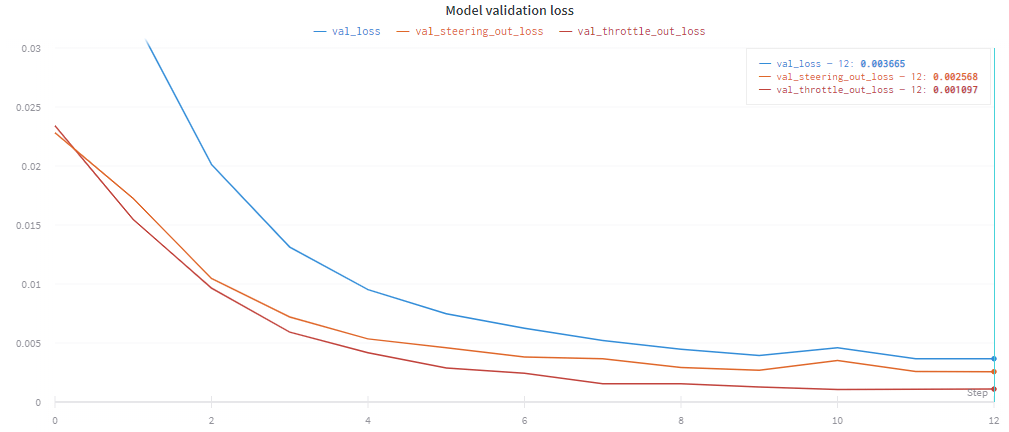
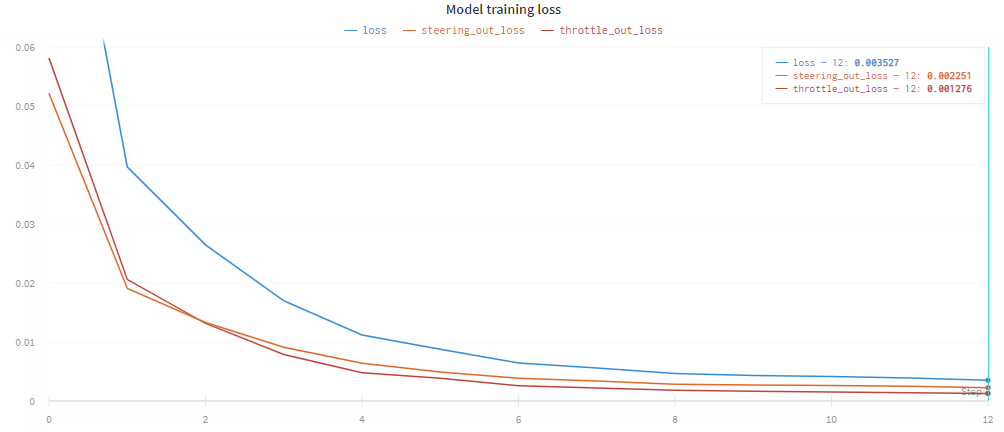
Here is the training loss plot with the two separate outputs plotted:
Here is the validation loss plot with the two separate outputs plotted: