Creating our first custom network architecture
Where do we even begin with the AI part of the project?
Well, I think it'd be a good idea to get the details of plugging a custom network into Donkey out of the way first.
If you remember the first autopilot we trained for sanity checking purposes, you'll recall we've used an architecture that came with Donkey, whose source can be found at donkeycar/parts/keras.py.
And that's pretty cool, we've already got a fair number of architectures to play around with out of the box. But we'll want to do things our way, make some custom architectures and play around with all sorts of stuff. It's also beneficial to be able to visualize how all of the pieces of your project come together before you dive all the way down into the details of it.
For now, I won't get into the details of machine and deep learning. That's a whole other bullet to bite, and a science of its own. One that I'm also in the process of getting to know. If you want to understand all of the details of the following content, you'll need to have some working knowledge of ML/DL. It's also okay if you don't. You'll be able to follow along and get your feet wet, you just probably won't get some implied details and minutiae.
Enough philosophising, let's get to work!
How do the architectures that come with Donkey work?
First things first, let's see how the architectures we get out of the box with Donkey work.
You don't have to, and usually probably won't, do this the way I'm doing it, which is going through the source code files and seeing what happens. You can consult the documentation or ask for help on the official project channels, but I love this approach since I believe you'll get a better sense of how something works if you look at the insides of it. I'm also used to hacking and taking things apart just to see how they work, (see ivanorsolic.github.io for examples) and sometimes you don't have the luxury of good docs and people willing to help you, so it's useful to be able to dive into the internals of something and make sense out of it. I also just think this way is much more fun 🤓, but YMMV.
SKIP TO THE TL;DR
When we wanted to train our first autopilot with Donkey, we used the train flag to tell the manage.py script to train a model.
So if we open up the manage.py script and look at the main method, we can see how the script handles the train flag:
if args['train']:
        from train import multi_train, preprocessFileList

        tub = args['--tub']
        model = args['--model']
        transfer = args['--transfer']
        model_type = args['--type']
        continuous = args['--continuous']
        aug = args['--aug']

        dirs = preprocessFileList( args['--file'] )
        if tub is not None:
            tub_paths = [os.path.expanduser(n) for n in tub.split(',')]
            dirs.extend( tub_paths )

        multi_train(cfg, dirs, model, transfer, model_type, continuous, aug)
Most notably, it uses the multi_train function that it imports from the train.py script. Other than that, it parses the rest of the arguments it needs to call the multi_train function and does some preprocessing with the list of tubs we want to use.
So, we'll open up the train.py script, and find the definition of the multi_train function:
def multi_train(cfg, tub, model, transfer, model_type, continuous, aug):
    # choose the right regime for the given model type
    train_fn = train
    if model_type in ("rnn",'3d','look_ahead'):
        train_fn = sequence_train

    train_fn(cfg, tub, model, transfer, model_type, continuous, aug)
We can see that it chooses the train function as the default function for training the models, but can also use the sequence_train function if the architecture is a sequential network. Cool!
Since we won't be implementing a custom sequential network, we'll take a look at the default train function. There's a lot going on inside the function, from managing the data and creating generators to split it into batches for training to handling different model filetypes, but we don't have to, and won't go through all the details. That's one of the reasons we're using Donkey, so we don't have to everything by ourselves.
Our goal is to use a custom architecture with Donkey, and we're trying to find out how Donkey uses the pre-defined architectures, so this line is very much of interest to us:
kl = get_model_by_type(train_type, cfg=cfg)
The function above is imported from donkeycar/utils.py, so we'll open that script up and find the definition of the get_model_by_type function:
def get_model_by_type(model_type, cfg):
    '''
    given the string model_type and the configuration settings in cfg
    create a Keras model and return it.
    '''
    from donkeycar.parts.keras import KerasRNN_LSTM, KerasBehavioral, \
        KerasCategorical, KerasIMU, KerasLinear, Keras3D_CNN, \
        KerasLocalizer, KerasLatent
    from donkeycar.parts.tflite import TFLitePilot

    if model_type is None:
        model_type = cfg.DEFAULT_MODEL_TYPE
    print("\"get_model_by_type\" model Type is: {}".format(model_type))

    input_shape = (cfg.IMAGE_H, cfg.IMAGE_W, cfg.IMAGE_DEPTH)
    roi_crop = (cfg.ROI_CROP_TOP, cfg.ROI_CROP_BOTTOM)

    if model_type == "tflite_linear":
        kl = TFLitePilot()
    elif model_type == "localizer" or cfg.TRAIN_LOCALIZER:
        kl = KerasLocalizer(num_locations=cfg.NUM_LOCATIONS, input_shape=input_shape)

    # And so on ...
    else:
        raise Exception("unknown model type: %s" % model_type)

    return kl
This is exactly what we were looking for. We can see that the function:
- Takes in the name of the wanted architecture as a string
(passed to the
manage.pyscript using the--typeflag) - Imports all of the architectures from
donkeycar/parts/keras.py - Creates a model using the appropriate architecture (based on the name)
- Returns the created model
It also defines the image shape and the region of interest crop that some models use, and sets the model type to the default type (defined in myconfig.py) if the type isn't explicitly passed through the type flag.
Okay, so now we know how the manage.py script gets the Keras model it then trains.
Let's take a look at keras.py to see how to define a custom architecture/model.
KerasPilot base class
We can see that there is a base class already prepared for us, that implements functions that all models use, such as model and weight loading, training and setting the optimizer of the model:
class KerasPilot(object):
    '''
    Base class for Keras models that will provide steering and throttle to guide a car.
    '''
    def __init__(self):
        self.model = None
        self.optimizer = "adam"

    def load(self, model_path):
        self.model = keras.models.load_model(model_path)

    def load_weights(self, model_path, by_name=True):
        self.model.load_weights(model_path, by_name=by_name)

    def shutdown(self):
        pass

    def compile(self):
        pass

    def set_optimizer(self, optimizer_type, rate, decay):
        if optimizer_type == "adam":
            self.model.optimizer = keras.optimizers.Adam(lr=rate, decay=decay)
        elif optimizer_type == "sgd":
            self.model.optimizer = keras.optimizers.SGD(lr=rate, decay=decay)
        elif optimizer_type == "rmsprop":
            self.model.optimizer = keras.optimizers.RMSprop(lr=rate, decay=decay)
        else:
            raise Exception("unknown optimizer type: %s" % optimizer_type)

    def train(self, train_gen, val_gen,
              saved_model_path, epochs=100, steps=100, train_split=0.8,
              verbose=1, min_delta=.0005, patience=10, use_early_stop=True):

        # And so on ...
The only three functions we need to implement ourselves in our custom class are: compile and run (and the constructor)
Let's look at the default architecture, the KerasLinear class:
class KerasLinear(KerasPilot):
    '''
    The KerasLinear pilot uses one neuron to output a continous value via the
    Keras Dense layer with linear activation. One each for steering and throttle.
    The output is not bounded.
    '''
    def __init__(self, num_outputs=2, input_shape=(120, 160, 3), roi_crop=(0, 0), *args, **kwargs):
        super(KerasLinear, self).__init__(*args, **kwargs)
        self.model = default_n_linear(num_outputs, input_shape, roi_crop)
        self.compile()

    def compile(self):
        self.model.compile(optimizer=self.optimizer,
                loss='mse')

    def run(self, img_arr):
        img_arr = img_arr.reshape((1,) + img_arr.shape)
        outputs = self.model.predict(img_arr)
        steering = outputs[0]
        throttle = outputs[1]
        return steering[0][0], throttle[0][0]
We can see that this particular class uses the roi_crop variable along with the input_shape, that gets passed to it through the utils.py script.
The class inherits the base KerasPilot class, and sets the self.model using the default_n_linear function, which actually implements the architecture in Keras.
It also compiles itself using the default parent class optimizer (adam), and uses the mean squared error as the error function.
Let's look at the actual Keras implementation in the default_n_linear function:
def default_n_linear(num_outputs, input_shape=(120, 160, 3), roi_crop=(0, 0)):

    drop = 0.1
    input_shape = adjust_input_shape(input_shape, roi_crop)

    img_in = Input(shape=input_shape, name='img_in')
    x = img_in
    x = Convolution2D(24, (5,5), strides=(2,2), activation='relu', name="conv2d_1")(x)
    x = Dropout(drop)(x)
    x = Convolution2D(32, (5,5), strides=(2,2), activation='relu', name="conv2d_2")(x)
    x = Dropout(drop)(x)
    x = Convolution2D(64, (5,5), strides=(2,2), activation='relu', name="conv2d_3")(x)
    x = Dropout(drop)(x)
    x = Convolution2D(64, (3,3), strides=(1,1), activation='relu', name="conv2d_4")(x)
    x = Dropout(drop)(x)
    x = Convolution2D(64, (3,3), strides=(1,1), activation='relu', name="conv2d_5")(x)
    x = Dropout(drop)(x)

    x = Flatten(name='flattened')(x)
    x = Dense(100, activation='relu')(x)
    x = Dropout(drop)(x)
    x = Dense(50, activation='relu')(x)
    x = Dropout(drop)(x)

    outputs = []

    for i in range(num_outputs):
        outputs.append(Dense(1, activation='linear', name='n_outputs' + str(i))(x))

    model = Model(inputs=[img_in], outputs=outputs)

    return model
And that's the last piece of the puzzle. It takes the number of outputs, the input shape and the region of interest via parameters, and implements a Keras model.
So, in summary, what are the steps for making your own architecture?
TL;DR: How to implement your own architecture
-
Create a new Python script (or open up the
keras.pyscript and work in there) -
Import the
KerasPilotbase model class:from donkeycar.parts.keras import KerasPilot -
Define a custom function that implements your architecture in Keras
-
Define a custom class that inherits the
KerasPilotclass, implementscompileandrunand initializes the model using the above mentioned function -
Add your architecture to the
get_model_by_typefunction inutils.py -
Use your architecture by passing the
model_typeyou defined inutils.pyas the type flag to themanage.pyscript.
Implementing a custom architecture
First, we have to come up with an architecture to implement.
We'll use Nvidia's CNN architecture from the End to End Learning for Self-Driving Cars paper by M. Bojarski et al.
Why this particular paper? Well, I think it's fitting since it has a nice bit of self-driving RC history behind it.
As Nvidia states on their blog, explaining the project behind the paper:
The groundwork for this project was actually done over 10 years ago in a Defense Advanced Research Projects Agency (DARPA) seedling project known as DARPA Autonomous Vehicle (DAVE), in which a sub-scale radio control (RC) car drove through a junk-filled alley way. DAVE was trained on hours of human driving in similar, but not identical, environments. The training data included video from two cameras and the steering commands sent by a human operator.
Hey, would you look at that! Back in 2004, DARPA had a seedling project which had an RC car autonomously drive through a junk-filled alley way. It was around the time the first DARPA Grand Challenge took place, in which a full-sized car had to autonomously navigate a 240 km route in the Mojave desert.
No cars managed to finish the course that year, with the best competitor's car (Carnegie Mellon) traveling a mere 11.78 kilometers.
Here's a picture of DAVE, taken from the DARPA-IPTO Autonomous Off-Road Vehicle Control using End-to-End learning report.
I recommend reading about the original (and subsequent) DARPA Grand Challenges, and the DAVE project. It's pretty fun to see how the history of autonomous vehicles began, and how the early researches found out about all of the challenges and their solutions on the way.
There's also a documentary about the DARPA Grand Challenge called The Great Robot Race by Nova. You can easily find it online.
The CNN Architecture
Here's a picture of the architecture, taken from Nvidia's blog:
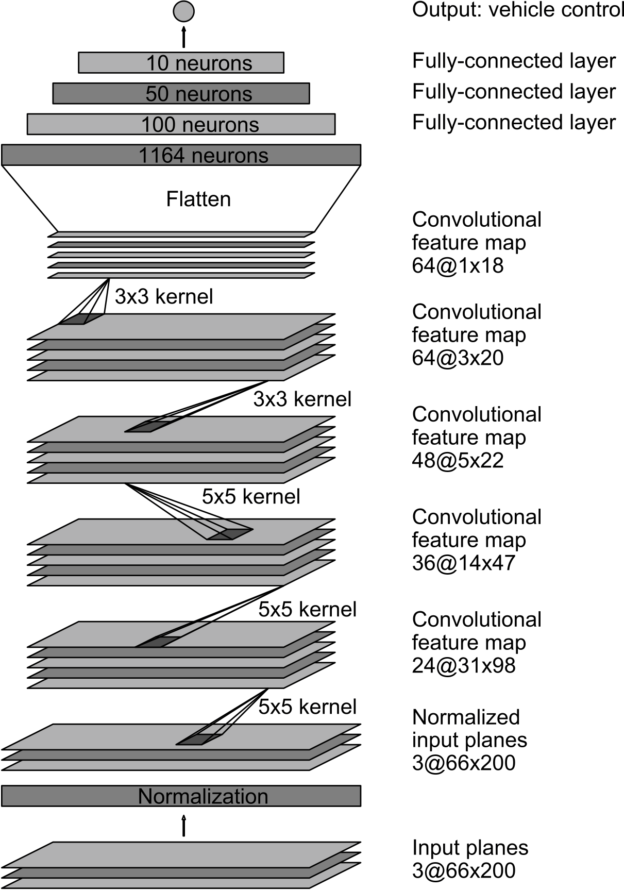
As Nvidia says in their blog post, the architecture consists of 9 layers, including a normalization layer, 5 convolutional layers, and 3 fully connected layers.
The first layer of the network performs image normalization. The normalizer is hard-coded and is not adjusted in the learning process. Performing normalization in the network allows the normalization scheme to be altered with the network architecture, and to be accelerated via GPU processing.
The convolutional layers are designed to perform feature extraction, and are chosen empirically through a series of experiments that vary layer configurations. We then use strided convolutions in the first three convolutional layers with a 2×2 stride and a 5×5 kernel, and a non-strided convolution with a 3×3 kernel size in the final two convolutional layers.
We follow the five convolutional layers with three fully connected layers, leading to a final output control value which is the inverse-turning-radius. The fully connected layers are designed to function as a controller for steering, but we noted that by training the system end-to-end, it is not possible to make a clean break between which parts of the network function primarily as feature extractor, and which serve as controller.
Pretty cool. Let's implement it in Keras!
I've created a new Python source file in the donkeycar/parts folder, named nvidia.py.
I used the KerasLinear class as a starting point, using its adjust_input_shape method to crop the image to the ROI passed to the model, since I think that's a good way to get better performance.
I've also made the following adjustments to the original architecture:
- I've omitted the normalization layer for now, which can be implemented using Keras’ normalization layers.
- I've added a 25 unit fully connected layer between the 50 and 10 unit layers, and a 5 unit layer before the output layer.
- I've added dropout regularization, with a 90% keep probability.
- I used two separate output units for steering and throttle, using the
KerasLinearmodel as a starting point.
This is what the above described architecture looks like implemented in Keras:
def customArchitecture(num_outputs, input_shape, roi_crop):

    input_shape = adjust_input_shape(input_shape, roi_crop)
    img_in = Input(shape=input_shape, name='img_in')
    x = img_in

    # Dropout rate
    keep_prob = 0.9
    rate = 1 - keep_prob

    # Convolutional Layer 1
    x = Convolution2D(filters=24, kernel_size=5, strides=(2, 2), input_shape = input_shape)(x)
    x = Dropout(rate)(x)

    # Convolutional Layer 2
    x = Convolution2D(filters=36, kernel_size=5, strides=(2, 2), activation='relu')(x)
    x = Dropout(rate)(x)

    # Convolutional Layer 3
    x = Convolution2D(filters=48, kernel_size=5, strides=(2, 2), activation='relu')(x)
    x = Dropout(rate)(x)

    # Convolutional Layer 4
    x = Convolution2D(filters=64, kernel_size=3, strides=(1, 1), activation='relu')(x)
    x = Dropout(rate)(x)

    # Convolutional Layer 5
    x = Convolution2D(filters=64, kernel_size=3, strides=(1, 1), activation='relu')(x)
    x = Dropout(rate)(x)

    # Flatten Layers
    x = Flatten()(x)

    # Fully Connected Layer 1
    x = Dense(100, activation='relu')(x)

    # Fully Connected Layer 2
    x = Dense(50, activation='relu')(x)

    # Fully Connected Layer 3
    x = Dense(25, activation='relu')(x)

    # Fully Connected Layer 4
    x = Dense(10, activation='relu')(x)

    # Fully Connected Layer 5
    x = Dense(5, activation='relu')(x)
    outputs = []

    for i in range(num_outputs):
        # Output layer
        outputs.append(Dense(1, activation='linear', name='n_outputs' + str(i))(x))

    model = Model(inputs=[img_in], outputs=outputs)

    return model
Now we need to implement our custom class, inheriting the base KerasPilot class:
- I used the adam optimizer and the mean squared error as the error function
- I've set the model using the above
customArchitecturefunction, passing it the number of outputs, the input shape and the region of interest - I've copied the
KerasLinearrun method, since it already implements everything needed to run
class NvidiaModel(KerasPilot):
    def __init__(self, num_outputs=2, input_shape=(120, 160, 3), roi_crop=(0, 0), *args, **kwargs):
        super(NvidiaModel, self).__init__(*args, **kwargs)
        self.model = customArchitecture(num_outputs, input_shape, roi_crop)
        self.compile()

    def compile(self):
        self.model.compile(optimizer="adam",
                loss='mse')

    def run(self, img_arr):
        img_arr = img_arr.reshape((1,) + img_arr.shape)
        outputs = self.model.predict(img_arr)
        steering = outputs[0]
        throttle = outputs[1]
        return steering[0][0], throttle[0][0]
Now we need to add our custom class to the utils.py script so we can use it through the manage.py script. I've appended the following lines to the get_model_by_type function, right after the rest of the pre-defined architectures:
elif model_type == "nvidia":
    	from donkeycar.parts.nvidia import NvidiaModel
        kl = NvidiaModel(input_shape=input_shape,roi_crop=roi_crop)
And that's it! We can now train a model using the manage.py script. Here's the result of training the architecture using this test dataset and running it in the simulator:
Not bad, considering it's trained on a really small dataset. Also, it's not the best driving data around. You can see it on the sharp 90 degree turns. It first goes as near as it can to the middle line, to take a swing so it can enter the turn faster. If we'd trained it on a much bigger dataset, with better driving data, it'd work better.
Let's move on to the next chapter, how to train your model.